Showing posts with label living room. Show all posts

Friday, August 2, 2013

Chair Rehab


We were lucky enough to have my sister and her family and then my parents visit back to back.  My parents trip was very last minute as my dad is going to have knee replacement surgery but was able to fit in a quick trip before the surgery so my parents decided to come visit.  They wanted to see the grand kids and take me some of my stuff that I have been keeping at their house (wedding dress, old decor, etc.) as well as a 1950s chair and turn of the century dresser I inherited from my grandparents.  My grandma passed in April so my parents have had the chair and dresser in the basement since they cleaned out her house in late April. 

My grandma (dad's mom) at her 94th birthday celebration, just a couple weeks before she passed; with her 3 great-grandsons; she also has 6 great-grand-daughters

And here is the chair that she gave me:

Except, these are the cushions it came with:

The cushions on it (seen in top pic), are from the matching rocker she gave me years ago.  We had this matching rocker in our bedroom until we moved to the lair. The rocker has been sitting in the attic since we made the move.
the webbing was all brittle and deteriorated and the wood needed some serious TLC

So I knew it needed some serious work but I was willing to take on the challenge.  I finally found a bit of time to tackle the beast this week. I started by removing all the old webbing and pulling all the staples.  Easier said than done-there were about a million staples  (even had to unscrew part of the chair to get the corner ones out).

I found some great elasticized webbing at Fabric Depot for $2.99 a yard plus everything was 30% off so 5.5 yards ended up costing me less than $12.  I didn't end up replacing the two horizontal straps as I realized they were added later and I don't think the chair needs them to be supportive.  I can always replace those straps in the future if needed.


Lastly, I cleaned the chair with some Murphy's Oil Soap and then gave it a good oiling with some Old English dark tint wood oil.  Just yesterday I decided to add some furniture wax to it for protection.  I did the same steps for our Lane coffee table while I was at it (don't you love how those two pieces complement each other so nicely even though they were from two separate grandmas?)

And there you have it...a repaired chair.  It is so comfy and I feel so lucky to have furniture pieces from Steve's (foot stool & round side table) and my own family in our living room.


Grandma & Grandpa visit Oregon!  My dad was nice enough to replace a toilet at our rental while he visited as well as repair our broken toilet seat-it was a loo kind of week :)

Can't believe she's already 2 months!

Camping at Cape Lookout State Park on the coast last weekend

Wednesday, July 17, 2013

Living Room Restyle


My talented and lovely sister visited this past weekend.  Her hubby and kiddos came too!  It was so awesome to have them here as it has been a couple years since they have been up this way.

My sis happens to have a knack for decorating and design-in fact, she has started her own design consulting in Los Angeles/Long Beach. 

Anyways, I always have a list of projects to get her help with or advice on when she comes to visit.  Sometimes I send pictures or facetime for help but that is just not the same. :)

Steve has been wanting to update our living/dining room spaces a bit and add some modern touches.  However, we wanted to do it without spending any or much cash.

 To take a trip back down memory lane, here is our living room on inspection day 7 years ago.  Gross, I know.  Check out that sweet paneling and faux brick.  How about those aluminum windows-purrrr!    How did we see the potential?

In between-serious work done but nothing pretty about it.

Here is the living room after major progress.  This photo leaves out the leaded glass in the built-in and baseboards.  We actually rearranged since this picture to have the couch under the window and the chairs on the wall behind where the couch is in this picture (it totally opened up the room), but I can't find any photos of it-boo!


And here it is now.  We swapped out the small 5x7 dark rug for the 8x10 light rug that we had in the dining room.  We currently are not using that rug due to a certain messy 3 year-old so it was great to pull out of the attic. 


We moved the coffee table trunk to the side of the couch and pulled my grandma's 50's Lane coffee table out of the attic. 

Rearranged the table and standing lamps. 


Swapped out a couple kick knacks. 


The Lane coffee table could seriously use a refinishing but I love how it makes the room less heavy and the proportions are awesome if I do say so myself.   Anyone know of a way to spruce up the table (think water stains and light scratches) without totally refinishing it? 
Added bonus: makes a great fort structure and hiding spot.


Other than that, we didn't do much but I can't believe how much bigger and brighter the room feels with just these few little changes.  I would like to purchase some dramatic 50s sculpture type piece for the coffee table and some fun pillows as well as hide all those cords by the TV but other than that, I love the new room! 

And best of all-FREE!


Saturday, February 23, 2013

A Little Privacy Please

A few years ago we decided we wanted a little privacy in our living room and dining room so I went about on a lengthy expedition for the "perfect" shears.  I ended up finding some awesome ones at Restoration Hardware-they were super long shear silk panels that I was able to cut apart to make into 6 smaller panels for our dining room and living room panels.

Well, here is what is left of them.  The ones in the dining room were tossed long ago as they started disintegrating in our fingers when we touched them.  I guess I'm no refined gal as I had no idea that silk disintegrated when exposed to the sun.  I brought them back to Restoration Hardware as they hadn't lasted more than a couple years and they were pricey-I think I spent around $80 on sale for 2 panels.  They have an awesome return policy as they couldn't find them in the system but still found a way to give me a $30 store credit.

Anyways, I have been searching for fabric to make new shears for I think over a year now.  I found some decent panels at Target that I once again cut apart and sewed into shears, however I got them up and it was a no go.  They were not quite shear enough (we still like to be able to see outside a bit) and I did a terrible job sewing them so they were not even at all.

Anyways, when on a fabric hunt with my sister-in-law for her twin boys a few weeks ago, I came across some awesome shear fabric at Mill End Fabric Store on Hwy 99.  For only about $30, I was able to get enough fabric for the 2 sets of windows and quite a bit of extra. 

This time, I decided that I wasn't going to mess around with ruining curtains, so I emailed my awesome aunt , who is a wonderful seamstress, and she agreed to make new panels if I mailed her the fabric and a diagram. 


We got them in the mail yesterday and when I showed them to Ben, he replied "wow, mom there are no holes in them".  I guess u should know your curtains are really bad when your not even 3 year old comments on their demise. Anyways, they are just perfectly bungalow and off-white for me, the right amount of shear, texture and pattern.  And they are straight thanks to my aunt!  Another bonus, totally washable as they are a cotton poly blend.  I washed the fabric before mailing it just in case it shrunk.

And new curtains just in time for the baby shower next week!

Tuesday, March 13, 2012

It's almost Spring!


You wouldn't have guessed it was almost spring in Portland this morning.  While snow is rare in P-town, it's basically unheard of in March.  (and I know that people who live in real snow country wouldn't even call this snow but you would be surprised by how many schools were either closed, delayed or had their buses on snow routes this morning) We woke up to snow this morning and while it now has melted, it was quite the surprise. 


there are a few signs of spring at our house...


Steve even tackled a quick project on Sunday when it wasn't raining.  He used some of the leftover stone from our front walkway project to "extend" the driveway.  We were finding that we needed to step into the dirt about half the time we took Ben out of his car seat and it was tracking lots of mud into the house.  We were also stepping on plants each time we did so. 
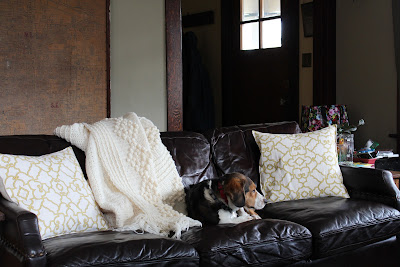
this pillow is a little plain if you ask me


And I tackled a little spring spruce up project myself-some lighter, more spring-ish pillows for our living room.  I was getting tired of the dark red pillows that we had.  This fabric took a lot of searching to find being that grey and yellow are the "in" colors (I LOVE them together but they just don't go with our house decor) but I ended up finding it at The Whole Nine Yards on E Burnside.  The best thing about the fabric is that it is totally washable!  Yea for that. 

Wednesday, February 8, 2012

A Big Ol' Map for our Big 'Ol Blank Wall


I have always wanted to put something on this big 'ol blank wall but never known what would be big enough for it.  And not too busy.  While I love picture walls that have a million little frames, I didn't think it would be right on that big wall behind our couch and the walkway to the rest of the house.
map waiting in our basement by the Goodwill pile

Enter Big 'Ol map.


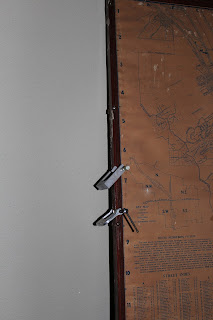
I bought it for Steve as a random gift a few years back after finding it in a basement at an estate sale sitting all lonely by itself in someone's basement.  And it was only $18.  Sure, it is well loved.  Water marks everywhere.  Yes, white paint splashes here and there.  Some areas where it looks like tape was previously.  and yerp, also some red crayon marks. 


But is 1936 portland map with its original frame.  It has an awesome patina, er, character in my opinion.  I dragged it up this week (but couldn't hang it on my own being that it is ~6'x4') from the basement and repaired the small split in the frame while Steve was at work.  He seemed a bit bewildered when he came home and saw it and sorta looked at me like, "why?".
However, he then humored me and helped me get it hung(it already had some old wire string attached to it so we just had to hang it from 2 picture rail hooks) and we love it! 
x at top is planned airport-where our current airport sits


old Portland airport was on the Columbia

description of map's purpose

 And look and some of the fun details.


Think it makes the room look so much cozier and complete. Don't you?


Still would love to find a way to remove some of the water marks or the white paint off of the frame while keeping the patina.  Let me know if you have any tricks up your sleeves.