Showing posts with label diy. Show all posts

Thursday, September 5, 2013

Bring it on, Fruit Flies!

Steve decided that he had enough of those pesky fruit flies last night.  After googling around the internet, he came up with this awesome recipe for fruit fly killer.  We can't believe how well it works-only wished we had started using it weeks ago.
Here's the simple recipe:

All Natural Fruit Fly Killer
  1. small wide mouth jar
  2. fill with ~ 1/4 cup apple cider vinegar
  3. mix in ~1/2 teaspoon dish soap
  4. set near fruit and watch those little buggers die


We "caught" at least 30 of those bad boys in 12 hours

And it even looks (sorta) pretty on the counter!


 We went camping with good friends at Beckler River campground over Labor Day-it's just 1.5 hrs east of Seattle.  There was a lot of sleeping done by the little lady and a lot of exploring done by Ben.  It was a blast!


 My little boy is getting so old, started his second year of preschool this week!


Monday, June 18, 2012

Escher DIY Stair Stringers

via
Steve was hard at work over father's day weekend.  No play time for him.  He was quite the superstar.  He built our stair stringers for the basement!  and they rock!

Steve started by referencing our local codes and then by designing the stairs in AutoCAD, a design program he has at work.  However there is a great stair design program that is free online and that I linked here.  Be sure to account for the depth of your floor at the top and bottom of the stairs because code does not allow much variation in riser height between stairs.  
I will try to explain all this the best I can but I am not a technical gal, am impatient when it comes to things like this, and darn it, was only in and out for most of the project.  I snapped photos and took notes in my head when I could.  FineHomeBuilding also has a very in-depth tutorial on framing stairs.


After having it all designed, he used pressure treated 2x4s to screw in a board where the stringer would end.  He then made the handy jig that is pictured up above to have a precise measurement of the cuts he needed to make.  He put x's on the parts he needed to cut (he always does this-that smart man) so that he won't get confused after everything is turned around and he is thinking of a million other things while making the cuts.

Because old houses are all whonky, be sure to check for how level and plumb things are after each cut as many adjustments may need to be made even though it is all the same when drawn out.  Steve just used a basic old level and a plumb bob to do this.  He clamped the stringers in place when he checked each time.
Steve made the initial cute using the chop saw.  He thought this would get them straighter and help avoid squeeky stairs in the future.

He then used a hand saw to finish cutting the corners that the chop saw didn't reach.
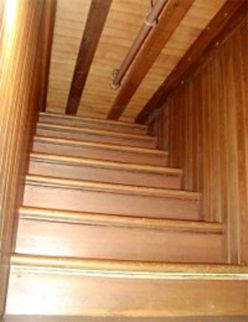
He decided on 3 stringers for extra security and decreased squeekiness-these puppies should last 100+ years!  He attached a 2x10 using simpson brackets so that he could easily and securily screw in the stringers.  Although more pricey, he also used simpson screws instead of framing nails so that he could easily move anything that he didn't put in right.  Notice the middle stringer and the piece that just broke off-doh!  sux but plan to use some gorilla glue to put back into place.  He put it in the middle so hopefully the strength won't be too affected.

And there they are!  Still can't use 'em but luv 'em.  Steve is traveling for work most of this week  so we hope to have some temporary treads in by the weekend.  We may also spend this weekend relocating the built in to make way for the new upstairs stairs.
Winchester Mystery House Stairs that lead to nowhere via
Oh yea, so our friend stopped by and saw the new stringers.  I pointed out that they reminded my of the Winchester Mystery House stairs.  How both of the stairs go in the same direction right now.  He, on the other hand, with an art degree, pointed out that they remind him of the Escher paintings of stairs.  funny the different perspectives.

And of course our main squeeze....
A rare smile for the camera being 2 and all-must be all those m&ms he earned for using the potty today:)


starting the jump-excited

and we're bending to jump-Go!

Monday, June 11, 2012

B is for Bubs

 or Ben or booty-licious. 

I think I have written a bit about being in the process of slowly turning Ben's room from a nursery into a big boy's room.  Well, this weekend, in lieu of organizing our attic, I decided it was high time to work on his room.  I have many little projects in progress, but here is a quick one that I finished.  

I have seen so many cool things done with maps on pinterest and of course, letters are all the rage right now.  So I decided that I would take the plain B from Ben's nursery and make it less baby, more boy. 
 I first took the letter and places it on an old AAA map of Oregon that I had laying around.  I was sure to align it so that I would capture Portland (where we live), Hood River (we like visiting that area and go camping near there each year) and Eugene (where Steve is from).  Then I just traced the letter in pencil onto the map and cut it out.

I then used some blue paint that I already had and brushed it on haphazardly.  I like the sort of worn look of it.  Be sure to get a little on the top in case your map doesn't line up just right. 

I let the paint dry for about 15 minutes give or take a few before using good 'ol Elmers to glue on the map.  I let that dry another 10-15 and then mod podged it to seal it all in.
Anyways, I love how it turned out and can't wait to get it up in the big boy room.
best stool for little ones-nice and tall Ikea $8

great little potty stool-especially the nice high guard in front for boys Ikea $5

I think Ben is enjoying running around the house in just his Thomas skivvies

B is for booty-licious you ask?  I couldn't help myself.  We are fully immersed in potty training over here at Rose City Bungalow and I just think Ben looks so booty-licious in his little Thomas the Tank underwear.  And while he hasn't yet told me he needs to use the potty, he has gone several days now with only 1 accident.  While I feel like a repeating record "Ben it's time to go to the potty.  Ben, do you need to use the potty?  Ben, when the timer goes off, it's time to use the potty", it's not too shabby being that he just turned 2 in April but we'll see what happens-he could decide he's over it tomorrow.  Cross your fingers and please send any great potty training tips my way.

Friday, June 1, 2012

Rolling Toy Storage


I bought this crate many moons ago at an estate sale when I was old crate crazy.  I was snatching up every crate I could get my little paws on for a few weeks.  I have another fun DIY crate project coming up soon. 
And this one I had been eyeing in my parents basement for over a year now.  It weighs...A TON!  Maybe 10lbs?  maybe more.  Anyways, I had my dad bring it to me when he drove through Portland last week-woot! woot! I scored.


I've always thought that turning them into rolling bins with caster wheels would be awesome.  And now that I have a little tyke with way too many large toys, I was in need of some extra toy storage space.  I am also in the slow process of converting Ben's room to a big boy room (insert sniffle).  A couple months ago we got rid of the changing table dresser (and no, that does not mean Ben is potty trained).  And now I am in process of changing out all the wall art to big boy stuff.  Last to go will be the crib...thank goodness Ben has not yet climbed out of his crib (I bet he could if he wanted to).

Anyways, really simple to make.  And if you don't have any crates on hand, you can find 'em new at Joanns or at most vintage stores
 

DIRECTIONS:

1. get four swivel casters.  I got for 4 for $5 at home depot-they all came in one pack and were 1 5/8"
Also purchase screws.  The package of my casters said that the holes on the caster wheels allowed for #8 screws.  So I picked up 16  #8 screws & washers (for one rolling storage bin) that were 1/4" longer than the depth of the wood at the bottom of the crate.  I figured this out by trial and error.  Just a guess-timate.  :)

2. Find a drill bit that just fits into the holes in the casters

3. Align wheels and mark holes with a pencil.

4. Drill holes.

5. Push screws through and attach nuts to secure.


6. Fill with your stuff and enjoy.

Have you made any fun and simple DIY projects lately out of vintage or found items?  What else would you put in the rolling storage bins?  I could see some of my nice books inside of one.  


Here are some pictures from our hike up Dog Mountain on the Columbia River on the Washington side from last weekend.  We took the hike Monday and my legs were burning until yesterday.  The wildflowers and view were unbelieveable!  My hiking partners were also pretty darn adorable! My 3 boys and me!