Showing posts with label bathroom. Show all posts

Monday, July 15, 2013

Washroom


Because I have majorly failed to keep up the blog recently, I thought I would post some pictures that I have taken of design I love while out and about over the past 6 months.

These pictures were taken in the loo at Schoolhouse  Electric.  I love the simplicity of the room with the extra long marble subway tiles on the floor, metal door, wood wall and white subway tiled wall.  Talk about a mix of materials.  It is simple and gorgeous and interesting. 


We have done a bit of rearranging in the house so I hope to share those pix soon :).


Hope you all are enjoying your summer-it's gorgeous here in Portland.
Quinn-she's 7 weeks already!   ...and such a sweetheart

Friday, January 4, 2013

It only took 2.5 years

Today, I took a bit of a break from purging and organizing and instead focused much of my energy on finishing a few little projects that have been hanging over my head for weeks, months, and years.
Inspiration? Driving me nuts as well as getting daily emails from apartment therapy (thanks bungalow chronicles for the idea)- they call it the January cure and send daily ideas to help u get your home clean and organized.

-Anyways, first I got down on all 4s (gotta do it before my belly gets too big) and scrubbed the bano floor. I hope to seal it once it all dries. Our tile guy said that we should seal heavily used tile once every 6 months. Yikes! It's been 2.5 years!

-finally installed the CO2 alarm that I bought months ago

-hung a few things in Ben's room ( more on that soon:)

-AND, after 2.5 years, I finally hung a switch plate on the light switch in our bathroom! The tile needed to be cut away a bit so that is why the project was so delayed. I had bought a special dremel attachment to do this, but of course I couldn't find it today. So, I just put a small drill bit in the drill and ran it over the tile until enough of it had been chiseled away. Not even too tedious, only took about 10 mins.
 
Then I used some of the lil yellow spacers pictured below to bring the switch out and flush with the tile.
 
 I finally inserted 2 longer screws to hold it all together so that I could put on the switch plate I purchased 2.5 years ago from rejuv seconds for $5 and miraculously had not lost!

Makes the bathroom look so much more finished. Maybe we will finish the bathroom before the next baby comes


Wednesday, April 25, 2012

Almost there

Are you tired of reading about our bathroom?  Well, I'm tired of posting about it.  We have a couple more projects down and just a few more to go.

ΓΌ  Artwork-check

These little pictures are called "Hilda" prints.  The first time I put them up, I used 3M strips to try and not put holes in the plaster but it was a HUGE fail, all but one picture came crashing down within a day and shattered all over the floor


ΓΌ  Latches-check


ΓΌ  Plaster-check

ΓΌ  Paint the wall-check


To do:
o   Ceiling paint by new plaster

o   Paint & install window/new privacy window glass
o   Fix ceiling electrical box
o   Fan
o   Fix plaster by window
o   Install escutcheon plates under sink

o   Fix light switch by bringing out to make it flush with tile

Thursday, March 8, 2012

Bathroom Cabinet Reveal


Isn't she pretty?  We just love her more than we ever could have believed and can't believe we waited two years to get her in.  Oh well, waiting makes the heart grow fonder, right?


And here she is all filled up (so nice to finally have some toiletries, towels & extra T.P. live in the bathroom).

I spoke to our carpenter Alan about what he recommended for paint.  We have previously used Miller paints (a local paint company) acro pure paint for our doors and trim.  The color (a nice creamy white) that we have used throughout the house is Polar White.  While we like that the acro line is low VOC, I keep hearing things about low VOC paints not holding up long term.  I have also noticed that our kitchen cabinets have not held up as well as I would have hoped after 5 years.  So while I like low VOC, I think that I like long term durability better.
Alan recommended going to Miller or Sherwin Williams and asking about their latex paint line that has similar properties (hardness, durability) as oil paint.  When I went into Miller, they recommended either their Evolution (the best) or acrinamel (also good).  And when I heard that the Evolution was 20% off, making it less than a dollar more than the acrinamel for a gallon, I was sold.  I got the 20% off after signing up to be a member (FREE!)-basically they will keep track of all of your paints and also send you coupons AND you get 10% off each time you come in.  The gallon came in just shy of $40 (a lot, but worth it if it lasts a long time and doesn't chip) and I had a coupon for $10 off of $50 (I linked it for you and it doesn't expire until the end of the month). So I got $10 worth of paint supplies for free!
just after Ben told me something along the lines of "more paper mama"

They recommended a thin coat of primer along with 2-3 thin coats (it dries more slowly than typical latex so drips might form quite a while after you are done with the coat) of the Evolution.  I put on 3 coats. It is a nice thick paint so you have to be careful not to slop it on.
we've just started potty training-several successes so far!

I am so glad that spring is in the air-it inspired Steve to get the yard ready for spring, got us out on a hike and got me in the purging and organizing mood!

Now we just need to put on hardware but first we are hoping to find stoppers for the hinges so that the hardware won't dent up our door trim since the doors knock into the door trim  when they are opened all of the way.
We just got this print of R&R market in the mail (used to be in our neighborhood but now Fire on the Mountain (awesome little pub) is at this location).  It was a photo that I had a friend snap a couple months before the sign was taken down and that my sister-in-law and I photo-shopped together.  I had a living social deal to print it on canvas.  I can't wait to hang it in the bathroom but first we need an exhaust fan!

Monday, March 5, 2012

Plaster Skim Coating Recap

Well, I posted just last week about our first adventures in plastering and wanted to share about the couple things we learned...and I think there would be tons more to learn had we wanted a smooth coat or had been plastering a large area. 
1. try to avoid using old plaster.  We did use old (2 years but never opened) plaster but felt we sot of got around it by sifting the plaster to remove any little clumps (we couldn't see any but plaster has a way of changing over time with even just moisture in the air).
2. Be prepared for it to look like crap at first pass SO I would recommend doing a very small area to start so that you have plenty of time to go back over the plaster and work with it for a little longer.

can't really even see the cracks in the picture but there are a bunch of them-probably around a couple millimeters wide.

3. Don't use too much water.  It takes longer to try and will form cracks.  Steve did in one area on the second coat and the next morning we found cracks right there.  Steve plans to chip that part out and put on a new coat but I suppose you could probably just patch it with spackle.  We'll see how that goes. 

Sunday, March 4, 2012

The cabinet is in


Well, I proved to not follow through with sharing photos of our new cabinet on Thursday, but here is proof that it is in!  and we are thrilled.  What a relief to have it in after 2 years of an ugly open gap in our bathroom. 


Here is a picture of what our bathroom niche looked like just last week (with no plans to change it anytime in the near future)
Alan stacked the three cabinets boxes to make one big cabinet (I helped hold the top two up while he slid in the bottom)...a rather precarious thing but we did this to avoid needing to remove any door trim or tile

shelves with veneered edge

inside of cabinet

and here are a couple snippets of what is there now.  Not really sure how to photograph something this tall in such a tiny bathroom-I will play around when it is done.


And Alan also made the trim and door for our laundry chute which I absolutely love. 

I am over half way done staining and painting and hope to be finished tomorrow (will then let it cure and harden up for a couple days before loading the cabinet and installing the chute door & trim).  My fingers are covered in white paint as proof.
Ben enjoying the sprinkle of snow we got March 1st


Wednesday, February 29, 2012

Patch & Plaster: DIY Plaster-Skim coating

Yesterday was an awesomely successful day as far as bano progress.   Steve was a total rock star and I wasn't so horrible myself considering that I had the two little chit'rens to care for all day.  Laurel and Ben cooperated by taking a decent nap so I got some stuff done and ready for Steve to take off running as soon as he got home almost 3 hours early from work.

Before we started, I did a bit of reading about plastering on the interwebs and found the Bob Vila videos to be most helpful.

A few helpful sites with info on plaster repair & skim coating:
  • Bob Vila video 
    • this video is nice as far as the steps needed in doing plaster
  • Bob Vila video
    • this video details how to apply the plaster (thickness, going back over, etc.)
Here are the steps we took to get the job done:


1. First, be sure to cover everything up-plastering makes quite the mess-picture plaster chunks flying everywhere.
I then found a chunk of tile board in the basement to "prime" and later patch (which Steve did first thing when he got home) in the barren areas of wall.  I used this as opposed to blueboard (a product like drywall that is made specifically to take plaster) because I wanted depth to match exactly and everything else up was tile board.  If you use blueboard in the first place, then you can skip this step.  I then put a coat of plaster weld on everything to get it ready for plaster to adhere to it.  I would recommend a disposable foam roller or brush so that you can just toss it when you are done but I used a brush (which actually cleaned up pretty easily) to apply because it was all I has on hand.  We purchased all the plaster materials from Knez in SE Portland 2 years ago (yes, this project has been delayed that long!)-I remember that it was one of the first outings we took Ben on.  He must have been a week old-how time flies, he will be two in April!
And then you can plaster over the product from the point that it is tacky until 2 weeks later.


2. Apply mesh tape to seams.  Generally you would put wire bead on the outer corner edges but the other corner in our bathroom (seen just above) is quite round so we wanted to match the softness of that corner and metal bead makes corners very sharp.  Metal bead also reinforces the corner edges-something we don't have to worry about being that this edge starts 6' up. 
 
3. The scary part-mixing plaster.  Only make enough that you can use in about 30 minutes or so.  We used Imperial Plaster Veneer to skim coat.  We mixed in water until it was thick enough that it would basically retain its shape when you turned the trowel.  Think about not wanting the plaster to just fall off the wall when you apply it.


4. Plaster away!  This is harder than it looks and it helps to be an anal person (but not too anal cuz a DIY'er with no plastering experience can get it truly smooth.  lucky for us, our bano walls have lots of texture so this wasn't a problem.  Apply your first coat about 1/8" thick and be prepared to go over it many times, switching the direction of the trowel each time.  The videos also suggested getting the plaster on and then moving on and letting the plaster "set" for a few minutes before coming back and smoothing it more.


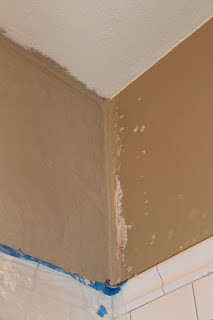
I promise, it looks much better in person

5. Our plaster was ready for a second coat (hard) after an hour or so (that's why you only want to mix small amounts at a time) so Steve applied again, this time he made his plaster a bit thinner and spread it on pretty darn thin.  Just enough to cover all the imperfections.  After getting it pretty much the way he wanted, I got to be the teacher and point out all his mistakes.  He then went back over the plaster for quite some time, dipping the trowel in water in between passes so make the plaster a bit more pliable and easier to work with. 
ceiling patch-visible lath will be covered by cabinet

6. Wait 10-14 days (if you just skim coated) for everything to cure (supposedly the plaster will turn pinkish) before you prime and paint!

Up tonight? Grind tile and complete new hall outlet.  Too bad I will be at a work function and can't participate-hehe.

Oh yea, don't the professional plasterers in the video make it look wicked easy and then you look like a dork with two left hands?