Showing posts with label bathroom; laundry. Show all posts

Tuesday, February 28, 2012

A little glimmer glamour for the chute

After we booked out our craftsman for the big bano built-in, Steve mentioned (which I had also been thinking) that maybe he could also build us a door and trim out the laundry chute opening in our hallway while he was here if we offered him a little something extra.
You see, our poor chute has been naked for a year now and a door and some trim would be pretty nice.  And the plaster has also been taking a bit of a beating (the blue tape was our band aid attempt for the plaster)Not that it is a hard project but we have never been quite sure how to cover the lath and plaster and exposed melamine compressed cardboard from the chute with stained trim.  We had all the wood as well as salvage hardware.  He said that it would be easy for him so we handed it off.  He, once again, will get it all ready for install but keep it out so that I can stain it first.  Then he said it should just take a few finish nails to install.  I feel like a bit of a fake (as far as saying we are doing the restoration ourselves) by handing off projects but we are in over our heads (aren't all old house restorers?) and time seems to shrink by the day with us both working and a busy toddler on our hands.  Oh yea, we also try to have some fun once in awhile.  So once again, can't wait to share more pix come Thursday when he delivers it all!

Oh yea, we showed him the picture of Bungalowcious' chute for inspiration (except we would like the hinges on the side and a knob with magnetic catch)

Wednesday, August 24, 2011

Week 2 of Challenge

It's already been a week and I managed to work on at least a project a day-enter pat on back. If you recall back to 8 days ago, I challenged myself to work on a house project for at least a few minutes a day to get myself back in the mood of working on the house and get some of those little projects crossed off the list. 
this wall above the toilet is screaming "adorn me"
Day 8: nothing, remember, I told myself I only needed to get things done 5/7 days.  ok, well I should say nothing to show.  I have been wanting to get some art for above the toilet in the bathroom and have wanted to pull some blue (gasp!-I generally use no blue in my house and have pretty much avoided it at all costs to this day) into the bano.  I am thinking something peacock-y and have been doin' some lookin' on etsy and ebay.  Have some ideas in mind but would like to hit up some local shops first-I will keep you updated.  Hope to get blue towels to match.  Mix it up a bit.  Add in something unexpected.  Our home is a bit to predictable at the moment. 

Day 9: Tuesday.  My friend Chris, lighting extraordinaire came by and helped me hang the awesome light that I bought off of him last month when we were selling things together at a little antique/salvage rummage sale in front of Old Portland Hardware here in Portland. 
Well, I love the light, but it has a few issues and most will be able to be fixed pretty easily.  
laundry chute

another view of laundry chute
hangs so low that Steve, being 6'2", almost hits his head on it each time he walks by
  1. move hideous make-shift "bathroom" cabinet.  This requires building a built-in to go in front of the laundry chute in the bathroom-hopefully will get this done in the next 6 months, that will be almost 2 years since we started the bathroom remodel.  Timely, right? (enter sarcasm, which I try to use often)
  2. raise up light several inches and adjust wiring accordingly.  Chris is able to help with this but needs to bring over the right tool to do so
  3. get 40 watt bulbs, easy, just a trip up the street to the local home do-it store.  All I had at home was 60 watt and I need sunglasses to use the light right now...got some!  way better
  4. possibly get new shades for the light.  The ones on there were free from Chris and are pretty but not quite my style.  Thinking of getting ones to match the ones in the bathroom.  Harmony is bliss.  
  5. this is the tricky part, it appears that this fixture still has knob and tube wiring and is therefore whonky as is the bathroom light.  Needs a new box and wiring.  This project will have to wait until we demo our upstairs. 


But none-the-less, I heart this light and really think it is pretty.  I hope to re-use the previous light upstairs at some point...maybe in the stairwell.  However, I don't think the stairwell is equipped to handle any sort of light fixture right now, do you? 
light fixture that previously hung in the hallway and below the shade, ignore dust, I will blame it on constant construction instead of lack of dusting :)

looking up our stairs to the attic.  check out the hot ceiling work and lovely 80s wallpaper

more hotness
from Rejuvenation
 Also, I love how the new light in our hallway goes so well with the one in our bathroom (yes, feel free to scroll up to check out the way the new light looks again:).  It will look even better once it has square shades to go along with the other square shades. 

Saturday, February 12, 2011

Ah Ah Ah Chute

So we were lucky enough to have my parents come and visit this week....their visits are much more frequent now that Ben is in the picture and my mom is often found surfing the web for airline deals. 
Upon arrival, my dad is always willing to tackle a project for us and he took on a duezy of a project this week-constructing a laundry chute!
When researching how to install a chute, some of the resources I found reported that you should expect this to be a full weekend project.  In response, I stupidly thought, "what could take so long?"  Wow, was I wrong.  I always forget that most projects take at least double the time when you factor in the words OLD HOUSE or NOT PLUMB or A MILLION LITTLE PROJECTS BEFORE.
My dad spend half of Monday (when they arrived) thinking about how he would construct the chute.
He spent Tuesday waiting around for Ben to finish naps (then we brightly realized we could move Ben to an upstairs pack n' play for the remainder of his naps so that my dad could work the whole day) and we went to buy materials.  Since we could find no codes in Portland about laundry chutes, we were free to do whatever we wanted.

*GOAL* 12"x12"x10' chute with 12"x12" access hole from hallway

Materials:
-1"x12" fiberboard with plastic coating (sold as shelving material)--> we purchased four 4' boards and four 6' boards to span butting through the joints to the 3rd floor (we plan to expand chute when we remodel our upstairs attic) through to the basement.
-1 1/4" drywall screws
-bracing brackets
-a lot of patience

While this may seem simple and straightforward, each step took hours....I would like to say that the explicatives heard were something that Ben has never been exposed to but then my nose would grow...I guess we have another couple months before he'll start repeating us :)

1. Make sure that support joists not in way of where chute will lie or support walls
2. Move electrical wire, grounding wire and radiant floor tubing (sorry, forgot to take picture of before)
3. Cut holes in floor and ceiling
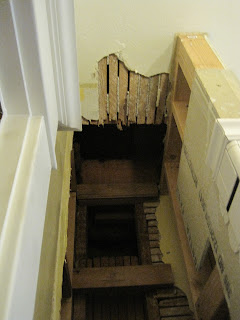
ceiling hole
floor hole with chute already installed

4. Fir out wall so flush throughout so can later attach fiberboard chute
used leftover fir flooring to fir out wall

you see 45 degree angled 2x4s that will support chute insert for hallway access

5. Cut out lath and plaster hole in hallway (now this has multiple steps in itself being that plaster will break very easily
when removing plaster after cut-we use tape to add a little support strength to plaster after cutting
  • outline where to cut on wall
  • use reinforced dremel rotary blade (said made for metal) to carefully cut through plaster
  • remove plaster-I drive screw driver through middle of hole and then carefully pulled out plaster in 2 pieces
  • once again, use dremel to cut through lath (we have found that any other saw caused too much vibration and therefore would break extra plaster loose-a major no no & headache)
    • I broke all of our dremel blades and therefore my dad and I resorted to using a hack saw to finish removing the lath (enough was already removed to get a hack saw in there) which worked quite well and was also fast
6.  Assemble top half of box, leaving one side off so that there is access to screw to existing wall
7.  This is where it got a little cumber some and non-OSHA compliant.  My dad then lifted that half of the chute through the hole in the floor and then I held while he ran upstairs.  He then hoisted it into place and I got on a ladder, leaning over him to finish screwing in pre-drilled holes with partially put in screws into the wall---> wish I had a picture
8.  Next we had to put in the  little box that my dad had made to connect the hallway hole to the chute so that a hole and lath and plaster was not exposed, the bottom has a 45 degree angle so for extra clothes "chuting" ease.  We did this before putting in the last piece after first trying it the other way and finding that you could not fit the little box in from the hallway because of how it was furred out to accommodate cuts and fitting around the lath and plaster.

9.  Lift the bottom half of the chute up from the basement through the floor hole and I put screws in through the pre-drilled holes while my dad held into place (much more OSHA compliant I have to say)

10.  We (mostly my dad) then fitted the front pieces of the box into place that we kept off to allow access for drilling rest of box to attch to wall.  This part was a little tricky as we had to sort of wiggle the piece into place (he had the very topd bottom several feet attached when putting in steps 6 and 9 because he did not need access for screws at those places) and  then reach those the hallway hole and bang into place with our fist.

11. Drill screws into brackets to attach piece fitted in step 10.

12.  Test chute-she works!  (I should mention that we were going to let Ben send the first thing down but decided this may cause havoc in the future when everything gets sent down the chute by him)
putting our sheets through for the test run

it made it through
Did we reach our goal?   *GOAL* 12"x12"x10' chute with 12"x12" access hole from hallway
Well, pretty much....11"x11"x10' chute with 12"x12" access hole from hallway

We still need to build a door and put on hallway trim but that is another project for another weekend week.
I already love it and look forward to not have laundry in our closet any longer or lugging it down the basement stairs several times a week.  Now, a separate chute for cloth diapers?  Hey, a girl can dream.

Thursday, January 27, 2011

Laundry Chute Installation DIY

Because we always have unfinished projects, we are now doing some research on how to install a laundry chute.  I found various information on many different websites giving helpful info with many different sorts of recommendations.  One website stated that many cities actually have codes on laundry chutes due to fire wall blocking that is required as well as materials.  I referenced Portland's codes and was unable to find anything so I guess that we could build it out of saran wrap and tin foil if we really wanted to!  (maybe I should call the city to confirm:)
Oh yea, the laundry chute (as I think I've mentioned before) will go in our bathroom, behind the built-in cabinet that is not yet built-in built, that will be in the space between the shower and hall.  We plan to access the chute from the hall as to not take valuable cabinet storage space with access from in the bathroom.
Here is a little info that I found.  I think that we will use aluminum venting material to line the space and help reduce the chance of mold growth.  Now just a trip to Home Depot to figure out sizing, materials and cost.  The challenge will be putting it up to the second story for the eventual bathroom that will be added up there.

-first, measure to make sure that your entry and exit points of the chute really do line up?  Many people have written that they have planned the project only to find that the entry and exit points are feet off from one another when the tape measure comes out

SOME DIY TUTORIALS:

-The family handyman discusses steps to install a laundry chute as outlined here.  How to Install a Laundry Chute | The Family Handyman
 
-Construct a Laundry Chute | DoItYourself.com
-DIY network for wood lined chute