Showing posts with label basement. Show all posts

Thursday, July 25, 2013

The Lair


Finally.  A picture of the lair.  Not a nice one, but one.  Been promising for several months.  Not much to look at but the basement bedroom set up works for us.  We have two clothing racks to the right of the photo, where our laundry room is, that act as our closet.  People think we are crazy for living in an unfinished basement, but I've heard crazier stories.  For example, why do we pay money to go camp?  Think about it, you pay to live in the dirt, on a pad, with no facilities.  But I love it!  It's not as bad as I thought it would be.  One thing is for sure, it stays nice and cool which is awesome as the weather here has been really warm.
And the payoff will be even better once we have a new space to move in to.  

Monday, June 18, 2012

Escher DIY Stair Stringers

via
Steve was hard at work over father's day weekend.  No play time for him.  He was quite the superstar.  He built our stair stringers for the basement!  and they rock!

Steve started by referencing our local codes and then by designing the stairs in AutoCAD, a design program he has at work.  However there is a great stair design program that is free online and that I linked here.  Be sure to account for the depth of your floor at the top and bottom of the stairs because code does not allow much variation in riser height between stairs.  
I will try to explain all this the best I can but I am not a technical gal, am impatient when it comes to things like this, and darn it, was only in and out for most of the project.  I snapped photos and took notes in my head when I could.  FineHomeBuilding also has a very in-depth tutorial on framing stairs.


After having it all designed, he used pressure treated 2x4s to screw in a board where the stringer would end.  He then made the handy jig that is pictured up above to have a precise measurement of the cuts he needed to make.  He put x's on the parts he needed to cut (he always does this-that smart man) so that he won't get confused after everything is turned around and he is thinking of a million other things while making the cuts.

Because old houses are all whonky, be sure to check for how level and plumb things are after each cut as many adjustments may need to be made even though it is all the same when drawn out.  Steve just used a basic old level and a plumb bob to do this.  He clamped the stringers in place when he checked each time.
Steve made the initial cute using the chop saw.  He thought this would get them straighter and help avoid squeeky stairs in the future.

He then used a hand saw to finish cutting the corners that the chop saw didn't reach.
He decided on 3 stringers for extra security and decreased squeekiness-these puppies should last 100+ years!  He attached a 2x10 using simpson brackets so that he could easily and securily screw in the stringers.  Although more pricey, he also used simpson screws instead of framing nails so that he could easily move anything that he didn't put in right.  Notice the middle stringer and the piece that just broke off-doh!  sux but plan to use some gorilla glue to put back into place.  He put it in the middle so hopefully the strength won't be too affected.

And there they are!  Still can't use 'em but luv 'em.  Steve is traveling for work most of this week  so we hope to have some temporary treads in by the weekend.  We may also spend this weekend relocating the built in to make way for the new upstairs stairs.
Winchester Mystery House Stairs that lead to nowhere via
Oh yea, so our friend stopped by and saw the new stringers.  I pointed out that they reminded my of the Winchester Mystery House stairs.  How both of the stairs go in the same direction right now.  He, on the other hand, with an art degree, pointed out that they remind him of the Escher paintings of stairs.  funny the different perspectives.

And of course our main squeeze....
A rare smile for the camera being 2 and all-must be all those m&ms he earned for using the potty today:)


starting the jump-excited

and we're bending to jump-Go!

Monday, February 6, 2012

Basement Bano progress

Been gone from blogging the past few weeks but I actually have some finished work to report!  First of all, some pix from our little weekend trip to Pacific City a couple weeks ago.  We lucked out with a Groupon deal to stay at a hotel  with a beach view and were able to enjoy Fri and Sat without rain (rare for the Oregon coast in Winter).  Have to share just a few pix.

Pelican Brew Pub

luv little kid hats that have ears-Ben's puppy hat

and the fox hat


he figured out how to put his hands in his pockets and thought he was hot stuff


I have been talking over the last couple months about getting some things done in our main (and only real) bathroom before my parents came to visit as my dad was planning on building us a storage cabinet.  Well, while my parents did visit all last week (and it was lovely), of course plans got diverted and he ended up working on our basement bathroom. 
While it would have been completely lovely to have our primary bathroom looking more finished, Steve didn't get the chance to finish a few projects (electrical primarily) before my parents arrival.  We had also been planning on putting in a large storage cabinet in our basement sooooo naturally that is the project that my dad took on. 
Monday was pretty much a wash as my parents flew in mid-day and I had the little ones to watch.  My dad and I spent half of Tuesday shopping for supplies to work on the basement and installing a new sink at a property we manage while my mom watched the kiddos.  And that brought Wednesday which took my dad on an adventure-going empty in a borrowed truck and luckily coasting into a gas station, getting lost and then finally getting cabinet grade plywood (on sale, woo-hoo) from Home Depot and some other needed supplies.  So really my dad was only left with about 2 days to build.  And he did an awesome job. 
this is what the space (where the shelves ended up) looked like...you can see the sink plumbing in back
He started off by framing the space out which entailed taking measurements for the doorway (we are going to use an old door that matches our other doors that we found in the basement when we moved in) .  taking A LOT of measurements and then making some pretty extensive drawings with measurements.  He figured out that he would need 4 sheets of cabinet grade plywood (there is probably enough left over to make most of the main bathroom's cabinet as well). 


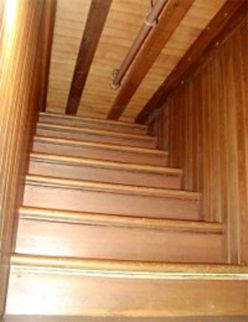
My dad didn't know we had a router, so originally he was going to cut grooves to slide the shelves in with a circular saw, however, I came home from work just on time on Thursday for him to explain what he was planning.  Luckily, I let on that we had a router which saved him hours of work cutting.  I ran up the street and picked up a 3/4" mortise router bit which makes those awesome cuts you see above.  He drew straight lines using a tape measure and level and then attached a 2x4 to run the router along to keep things straight.  We do have a router table but it is much too small for a project like this. 
he first leveled out the ground by adding 2x4s under this plywood (base of cabinet) and shims and using a level to check everything.
As my dad finished up cutting and sanding boards, I primed and then painted them using paint we had on hand and have used for the other cabinets/trim in our home. 
I forgot to sand in between the primer and paint so now some of the boards are pretty rough and therefore I need to go back with some fine sand paper and then slap on another coat of paint.  It saved so much time by painting before assembly.

Once my dad had everything all cut and ready, we crossed our fingers and prayed it would all fit together and go in smoothly.  He originally planned to assemble in all on its side, however, with low basement ceilings, my dad and Steve quickly discovered this wouldn't work.


Plan B.  They decided to assemble it upright just outside of the opening my dad framed for the cabinet.  After an hour or so and lots of pounding with a rubber mallet or hammer with a chunk of wood in between the hammer and cabinet, we got it all fit together.  And it even looked like it might just all work.  We found that it worked best to fit one part of the cabinet together, glue and nail it (with just one or two nails to start so adjustments could be made if needed) with an air gun and then move on to the next area.  The glue was not dry until after it was all together so nuthin' was set in stone.  We didn't put in the shelves until it was all in place.
this is the side of the cabinet that we will access from outside the bano-has the laundry chute and Steve plans to store his bike gear in here

inside bathroom access-tons of storage!!!


After it was all put together, we first attempted to just slide it in on top of the base wood, but found that it was too tight of a fit.  So they took out those boards, slid it in and then lifted it to slide the base plywood back in.  AND IT FIT!!!

After some playing around, they also got the shelves in, but found that the cabinet had flexed a bit so everything needs to be pulled back together with some shims between the framing and the cabinet so that the shelves fit more snugly. 


You can see the laundry chute cut out!  At last the clothes won't fall to the floor and make a huge mess!


And to the left of the chute, we put a plumbing access panel (for the tub drain just above) and covered using the spring fit cover just above which is a bit of a rip off at $15 for a piece of plastic and one metal spring but also awesome being that it allows easy plumbing access and will fit any opening between 10-15".  Home Depot also sells 9"x9" version.  We will surely use this again for access to plumbing when we build our other bathroom cabinet.

Someday we plan to build doors to the cabinet but that is real low on the list of things to accomplish.  Thanks again dad and mom-you are awesome!

Tuesday, November 22, 2011

What we've done, what worried me


**** I started this post before our re-fi went through in October but never finished it so it may seem a bit choppy****

There were a lot of little things that I accomplished over the summer, and also some big projects that we accomplished.  There are a LOAD that we have accomplished since we last refinanced.  Challenging myself to complete projects as well as the looming appraisal of our home for our refinance (yes, it went through!)  got me, let's say, off the pot.  However, there were still lots of things that are unfinished in the middle of being finished really needed to get done that I worried about for the appraisal.  Fortunately, we put a pretty decent down payment on our house and we have done tons of work, so we didn't have a huge concern about whether we would qualify for the refinance, however, I still wanted to get some things wrapped up.

Here are a few of the things that I got done the week before the appraisal on our house:

siding painted after 4 years lag, but check out that sorry window


progress, it's primed (ran out with the baby monitor during naps to get the paint stripped, sand and prime) and already lookin' better

heat gun out and in action-there were all kinds of tarps below and then we vacuumed the dirt (crazy, eh?) with a shop vac just to be sure all the paint was gone-probably some of it is lead
the bottom board (and one up from there too) is so rotted (too much dirt pushed up on the side of the house) that we will need to eventually replace or figure something else out
ooooo, paint, pretty
painted and drying-our neighbors (this side of the garage lines their driveway) are singing praise or more like have finally stopped cursing us (just kidding, we have the best neighbors)
another goal: lightly sand and paint the extremely faded south side of the house


nail a board up so that the hideous insulation is hidden & the frame at least looks better, although it is only a temporary solution as the whole door needs a new frame (think a good kick or tug to open the door)

hey, check it out, let there be light!, Steve put a light in our basement "toilet"...literally a toilet with curtains stapled around it

Dexter style basement bathroom

here is a picture of our basement bathroom "walls"

another pix of that light-better than the camping lantern we used to use

sand and stain old pressure treated posts for our small gate that goes between the driveway & backyard
Steve accidentally broke the middle lower pane of glass last year and there has just been a piece of plastic there...took a trip to Coast Glass and had the glass back in in about 10 mins-just nailed the wood pieces to hold the glass back in place
nice reflection

put back in the little wood strips that hold the window in place-these have been out for 5 years now and sitting on the ledge, ready to go

more of the strips added back in for a finished look

more of the south side of the house-where the heck is that piece of trim that goes below the window?  it's gone missing for 4 years now...we have since hung this board but I haven't had a chance to take a picture

And don't forget that this summer Steve has managed to strip all the paint on the back of the house and I repainted it, install an awesome driveway fence & gate Ben Pen and is in the process of finishing up stripping paint off the eaves and repainting.
Since our last re-fi (April 2009-just before I got knocked up : & we went to Peru), we have rebuilt our front porch and stairs to the front porch, landscaped our front yard, tiled our living room fireplace, re-plumbed the house, almost finished the bathroom remodel, plumbed out for another bathroom (basement-there is only a toilet in there and no walls), added trim in the dining & living rooms, had leaded glass made for our living and dining room built-ins, had the floors refinished and added a backyard brick patio and added a laundry chute.  I know that there are a million other little things we have finished but can't really think of them right now.  Not too shabby being that since that time (almost 2.5 years ago), we took a fancy trip to Peru (Inca trail & rainforest), lots of little side trips, and oh yea, baked and had Mr. Ben.
at the Portland Children's museum last month in the dig pit

How do I recall all that?  Well, I suppose I could reference this handy blog here but I cheated and just looked at pictures from our last appraisal report.  Boy, I forget how we used to live-amazing that it is so much better now but we still have sooooo far to go.  Deck anyone?  Dishwasher?  Garbage disposal?  No holes in our attic walls?   hmmmmm....lots to do

Things that worried me...


However, we are fortunate because the re-fi went through without a hitch (despite the depressing value that the appraiser assigned to our home) and we are at it again. Hopefully we will never have to re-fi again and can refocus our energies on projects...however, who knows as it is the holiday season and while I am greatly enjoying all the holiday coffee drinks (Can anyone say pumpkin spiced latte? Peppermint mocha?), I am disgusted by the Christmas stuff that is already for sale.  But have to say that we bought a living social type deal for a toy store and used it this past weekend so Ben is done for Christmas-woopty woo!